1. 클라이언트(Client)와 서버(Server)의 관계
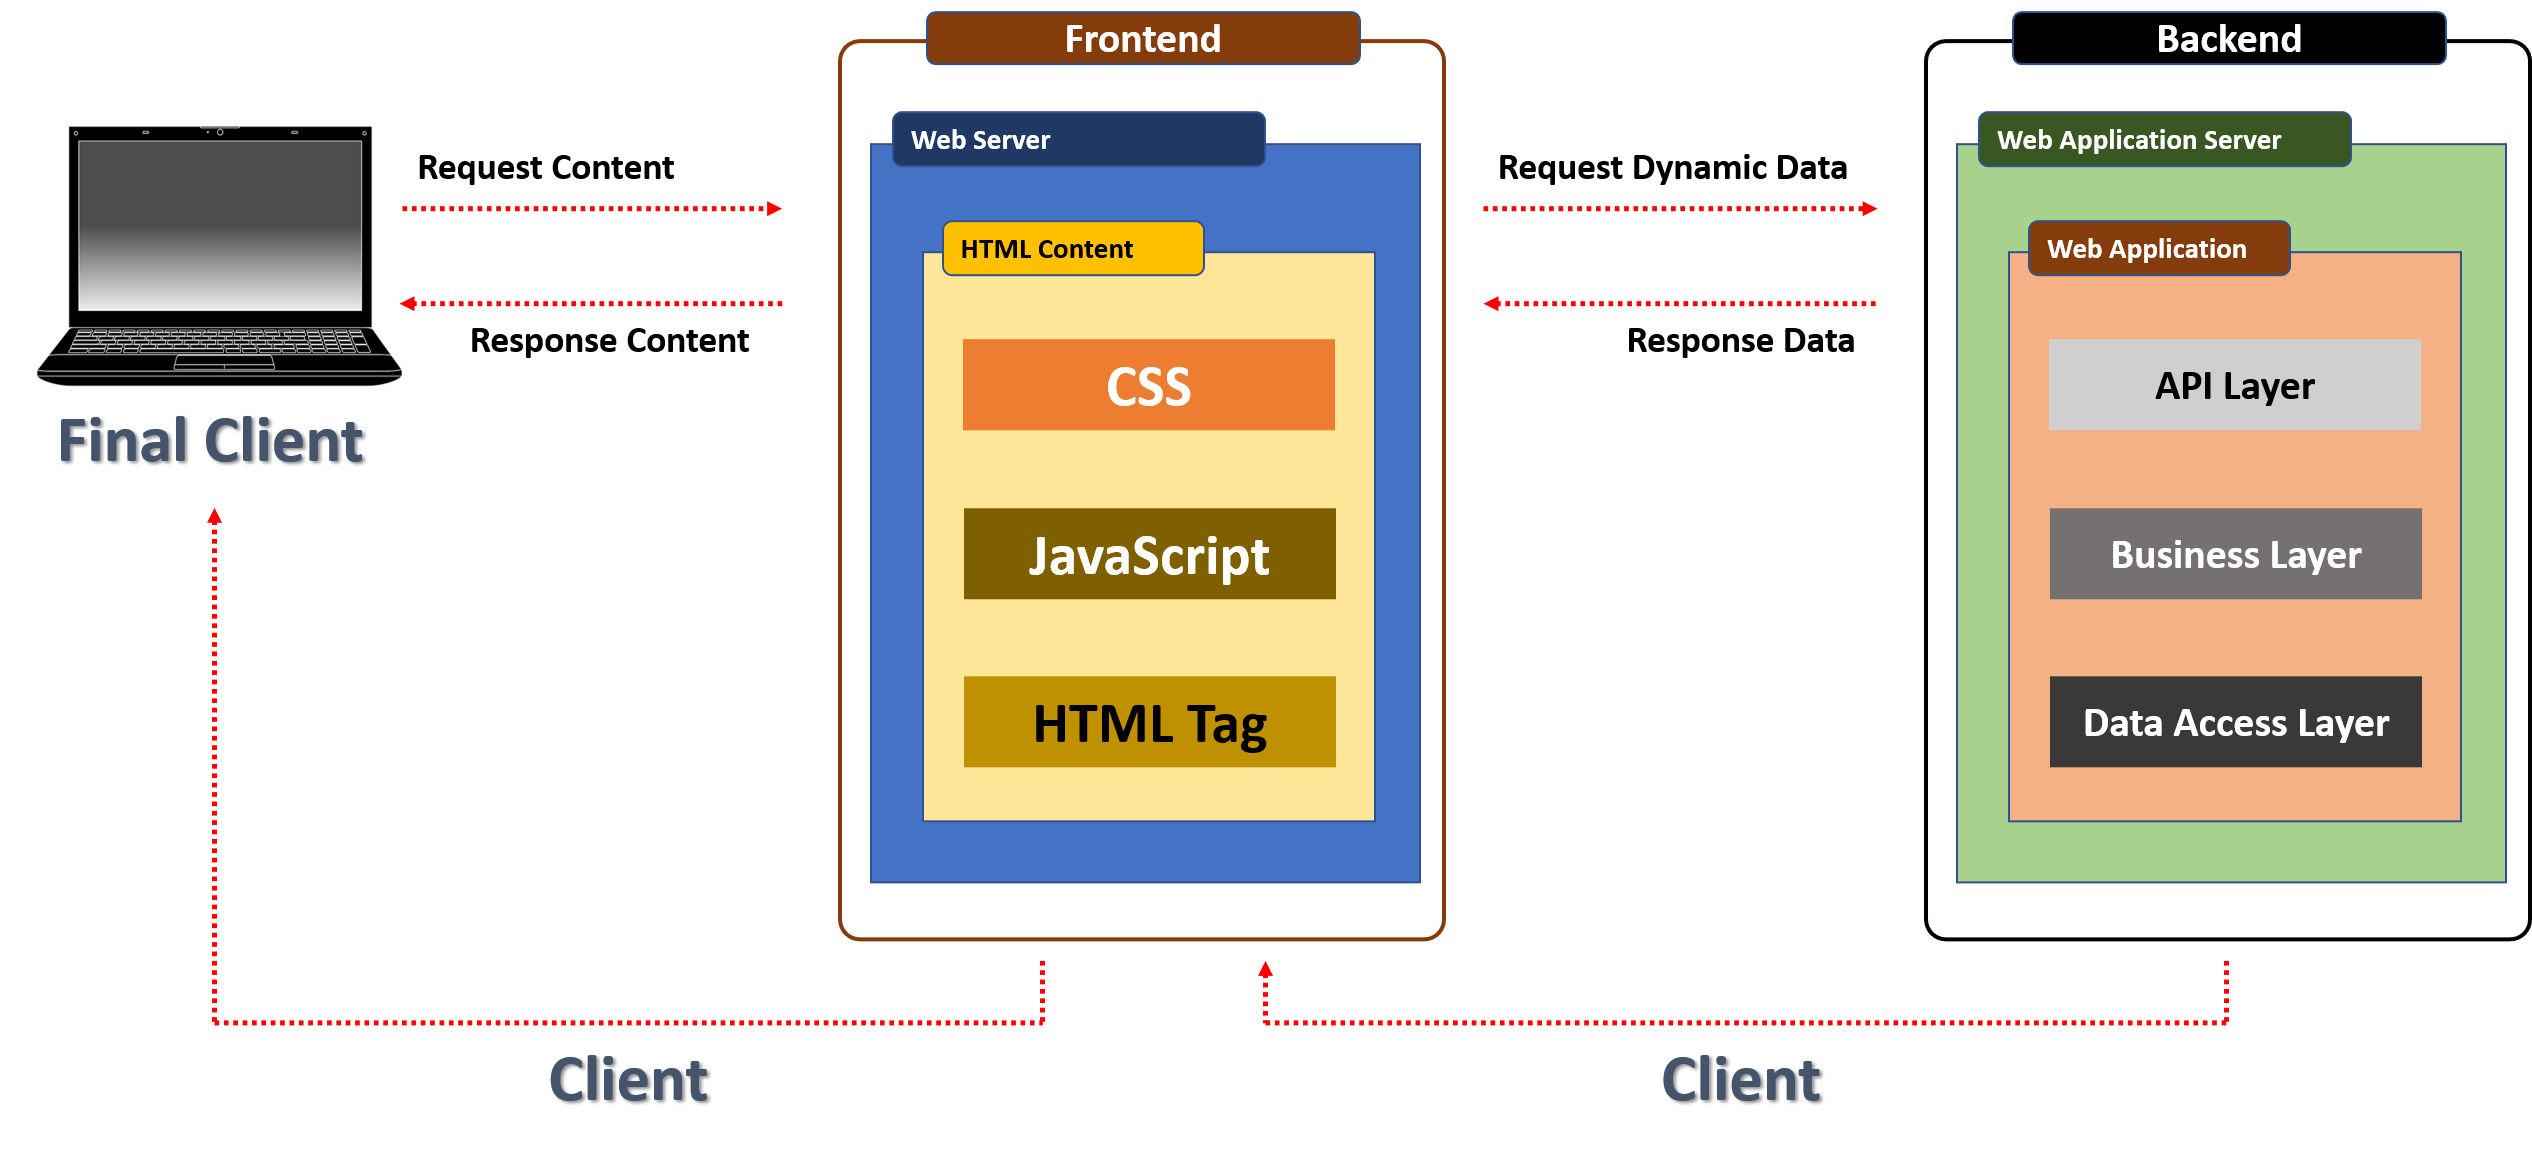
- WebBrower는 Frontend 서버에 content를 요청하면 Forntend 서버는 content를 찾아서 제공한다
- Frontend 서버는 WenBrower에서 요청한 content를 필요에 따라 Backend 서버에 요청하여 제공받는다
- 최종 Client는 WebBrower이지만 Frontend 서버는 필요에 따라 Client가 되기도 하고 Server가 되기도 한다
- Backend도 다중의 Server를 사용하게 되면 Request Server가 Client가 되기도 한다
2. Rest API
- Rest API 서버에 HTTP 요청을 보낼 수 있는 클라이언트 툴 또는 라이브러리를 의미한다
- postman과 같은 프로그램은 UI가 있는 Rest API이다
- UI가 없는 Rest API일 경우에는 Rest Client Library를 사용하면 된다
- Server와 Server 간의 요청이 대표적이다
▶ IBM REST API : https://www.ibm.com/docs/en/integration-bus/10.0?topic=apis-rest
3. RestTemplate
- Java에서 사용할 수 있는 HTTP Client 라이브러리
- java.net.HttpURLConnection
- Apache HttpComponents
- OkHttp 3
- Netty - Spring에서는 HTTP Client 라이브러리 중 하나를 이용해서 원격지에 있는 다른 Backend 서버에 HTTP 요청을 보낼 수 있는 RestTemplate이라는 Rest Client API를 제공한다
- RestTemplate이라는 템플릿 클래스를 이용하여 HTTP Client 라이브러리 중 하나를 유연하게 사용할 수 있다
4. RestTemplate 객체 생성
- Spring Initializr를 사용하여 프로젝트를 생성한다
package main;

public class RestClientExample01{
    public static void main(String[] args) {

        /*기본적으로 RestTemplate의 객체를 생성하기 위해서는
        RestTemplate의 생성자 파라미터로 HTTP Client 라이브러리의 구현 객체를 전달해야 한다*/

        RestTemplate restTemplate = new RestTemplate(

                /*HttpComponentsClientHttpRequestFactory 클래스를 통해 Apache HttpComponents를 전달한다*/

                new HttpComponentsClientHttpRequestFactory());
    }
}- 위의 코드는 객체 에러로 인하여 실행할 수 없다
- Apache HttpComponents를 사용하기 위해서는 builde.gradle의 dependencies 항목에 아래와 같이 의존 라이브러리를 추가해야 한다
dependencies {
	implementation 'org.springframework.boot:spring-boot-starter-web'
	compileOnly 'org.projectlombok:lombok'
	annotationProcessor 'org.projectlombok:lombok'
	testImplementation 'org.springframework.boot:spring-boot-starter-test'

	//추가한 코드
	implementation 'org.apache.httpcomponents:httpclient'
}- dependencies를 추가하면 객체를 import 할 수 있다
import org.springframework.http.client.HttpComponentsClientHttpRequestFactory;
import org.springframework.web.client.RestTemplate;

public class RestClientExample01{
    public static void main(String[] args) {

        /*기본적으로 RestTemplate의 객체를 생성하기 위해서는
        RestTemplate의 생성자 파라미터로 HTTP Client 라이브러리의 구현 객체를 전달해야 한다*/

        RestTemplate restTemplate = new RestTemplate(

                /*HttpComponentsClientHttpRequestFactory 클래스를 통해 Apache HttpComponents를 전달한다*/

                new HttpComponentsClientHttpRequestFactory());
    }
}
5. URI 생성
- RestTemplate 객체를 생성한 후 HTTP Request를 전송할 Rest 엔드포인트 URI를 지정한다
import org.springframework.http.client.HttpComponentsClientHttpRequestFactory;
import org.springframework.web.client.RestTemplate;
import org.springframework.web.util.UriComponents;
import org.springframework.web.util.UriComponentsBuilder;

import java.net.URI;

public class RestClientExample01{
    public static void main(String[] args) {

        /*기본적으로 RestTemplate의 객체를 생성하기 위해서는
        RestTemplate의 생성자 파라미터로 HTTP Client 라이브러리의 구현 객체를 전달해야 한다*/

        RestTemplate restTemplate = new RestTemplate(

                /*HttpComponentsClientHttpRequestFactory 클래스를 통해 Apache HttpComponents를 전달한다*/

                new HttpComponentsClientHttpRequestFactory());

        //URI 생성
        /*
        UriComponentsBuilder 클래스를 이용해서 UriComponents 객체를 생성하고
        UriComponents 객체를 이용해서 HTTP Request를 요청할 엔드포인트의 URI를 생성한다
        */
        UriComponents uriComponents = UriComponentsBuilder

                .newInstance() //UriComponentsBuilder 객체를 생성한다
                .scheme("http") //URI의 scheme을 설정한다
                .host("worldtimeapi.org") //호스트 정보를 입력한다
                .port(80)  //디폴트 값은 80이므로 80 포트를 사용하는 호스트라면 생략 가능하다
                .path("api/timezone/{continents}/{city}")
                /*
                URI의 경로(path)를 입력한다
                URI의 path에서 {continents}, {city} 두 개의 템플릿 변수를 사용하고 있다
                두 개의 템플릿 변수는 uriComponents.expand("Asia", "Seoul").toUri(); 에서
                expand() 메서드 파라미터의 문자열로 채워진다
                빌드 타임에 {continents}는 ‘Asia’, {city}는 ‘Seoul’로 변환됩니다.
                 */
                .encode()
                /*URI에 사용된 템플릿 변수들을 인코딩 한다
                 non-ASCII 문자와 URI에 적절하지 않은 문자를 Percent Encoding 한다는 의미이다
                 */
                .build();
                //UriComponents 객체를 생성한다

        URI uri = uriComponents.expand("Asia","Seoul").toUri();
        /* expand 메서드는 파라미터로 입력한 값을 URI 템플릿 변수의 값으로 대체한다
           toUri 메서드는 객체를 생성한다
         */
    }
6. Request 전송
- 엔드포인트로 Request를 전송한다
- getForObject(URI uri, Class<T> responseType)
- getForObject() 메서드는 HTTP Get 요청을 통해 서버의 리소스를 조회한다
- URI uri : Request를 전송할 엔드포인트의 URI 객체를 지정한다
- Class responseType : 응답으로 전달 받을 클래스의 타입을 지정한다
package com.dreamfactory.restAPI;

import org.springframework.http.client.HttpComponentsClientHttpRequestFactory;
import org.springframework.web.client.RestTemplate;
import org.springframework.web.util.UriComponents;
import org.springframework.web.util.UriComponentsBuilder;

import java.net.URI;

public class RestClientExample01{
    public static void main(String[] args) {

        /*기본적으로 RestTemplate의 객체를 생성하기 위해서는
        RestTemplate의 생성자 파라미터로 HTTP Client 라이브러리의 구현 객체를 전달해야 한다*/

        RestTemplate restTemplate = new RestTemplate(

                /*HttpComponentsClientHttpRequestFactory 클래스를 통해 Apache HttpComponents를 전달한다*/

                new HttpComponentsClientHttpRequestFactory());

        //URI 생성
        /*
        UriComponentsBuilder 클래스를 이용해서 UriComponents 객체를 생성하고
        UriComponents 객체를 이용해서 HTTP Request를 요청할 엔드포인트의 URI를 생성한다
        */
        UriComponents uriComponents = UriComponentsBuilder

                .newInstance() //UriComponentsBuilder 객체를 생성한다
                .scheme("http") //URI의 scheme을 설정한다
                .host("worldtimeapi.org") //호스트 정보를 입력한다
                .port(80)  //디폴트 값은 80이므로 80 포트를 사용하는 호스트라면 생략 가능하다
                .path("api/timezone/{continents}/{city}")
                /*
                URI의 경로(path)를 입력한다
                URI의 path에서 {continents}, {city} 두 개의 템플릿 변수를 사용하고 있다
                두 개의 템플릿 변수는 uriComponents.expand("Asia", "Seoul").toUri(); 에서
                expand() 메서드 파라미터의 문자열로 채워진다
                빌드 타임에 {continents}는 ‘Asia’, {city}는 ‘Seoul’로 변환됩니다.
                 */
                .encode()
                /*URI에 사용된 템플릿 변수들을 인코딩 한다
                 non-ASCII 문자와 URI에 적절하지 않은 문자를 Percent Encoding 한다는 의미이다
                 */
                .build();
                //UriComponents 객체를 생성한다

        URI uri = uriComponents.expand("Asia","Seoul").toUri();
        /* expand 메서드는 파라미터로 입력한 값을 URI 템플릿 변수의 값으로 대체한다
           toUri 메서드는 객체를 생성한다
         */

        //Request 전송

        //getForObject() 메서드로 HTTP Get 요청을 통해 서버의 리소스를 조회한다
        //응답 데이터를 문자열로 받을 수 있도록 String.class로 지정한다
       String result = restTemplate.getForObject(uri, String.class);
        System.out.println(result);

    }
}- 코드를 최종적으로 실행하면 아래와 같이 출력된다

1) getForObject()를 이용하여 커스텀 클래스 타입으로 원하는 정보만 응답으로 전달 받기
- 전달 받고자하는 응답 데이터의 JSON 프로퍼티 이름과 클래스의 멤버변수 이름이 동일해야 한다
- 해당 멤버 변수에 접근하기 위한 getter 메서드 역시 동일한 이름이어야 한다
package com.dreamfactory.restAPI;
import org.springframework.http.client.HttpComponentsClientHttpRequestFactory;
import org.springframework.web.client.RestTemplate;
import org.springframework.web.util.UriComponents;
import org.springframework.web.util.UriComponentsBuilder;
import java.net.URI;
public class RestClientExample02 {
public static void main(String[] args) {
RestTemplate restTemplate = new RestTemplate(
new HttpComponentsClientHttpRequestFactory()
);
UriComponents uriComponents = UriComponentsBuilder
.newInstance()
.scheme("http")
.host("worldtimeapi.org")
.port(80)
.path("/api/timezone/{continents}/{city}")
.encode()
.build();
URI uri = uriComponents.expand("Asia", "Seoul").toUri();
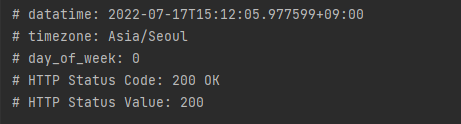
//WorldTime 클래스를 사용해서 전체 응답 데이터가 아니라 datetime과 timezone 정보만 전달 받는다
WorldTime worldTime = restTemplate.getForObject(uri, WorldTime.class);
System.out.println("# datatime: " + worldTime.getDatetime());
System.out.println("# timezone: " + worldTime.getTimezone());
System.out.println("# day_of_week: " + worldTime.getDay_of_week());
}
}- WorldTime에 대한 클래스를 새로 생성해야 한다
package com.dreamfactory.restAPI;

public class WorldTime {
    private String datetime;
    private String timezone;
    private String day_of_week;

    public String getDatetime() {
        return datetime;
    }
    public String getTimezone() {
        return timezone;
    }
    public String getDay_of_week() {
        return day_of_week;
    }
}- 실행하면 지정된 데이터만 응답 전송되는 것을 확인할 수 있다

2) getForEntity()를 사용한 Response Body(바디, 컨텐츠) + Header(헤더) 정보 전달 받기
- 응답 데이터는 ResponseEntity 클래스로 래핑되어서 전달 된다
- getBody(), getHeaders() 메서드 등을 이용해서 바디와 헤더 정보를 얻을 수 있다
- 응답으로 전달 되는 모든 헤더 정보를 보고 싶다면 getHeaders().entrySet() 메서드를 이용해서 확인할 수 있다
package com.dreamfactory.restAPI;

import org.springframework.http.ResponseEntity;
import org.springframework.http.client.HttpComponentsClientHttpRequestFactory;
import org.springframework.web.client.RestTemplate;
import org.springframework.web.util.UriComponents;
import org.springframework.web.util.UriComponentsBuilder;

import java.net.URI;

public class RestClientExample02 {
    public static void main(String[] args) {
        RestTemplate restTemplate = new RestTemplate(
                new HttpComponentsClientHttpRequestFactory()
        );
        UriComponents uriComponents = UriComponentsBuilder
                .newInstance()
                .scheme("http")
                .host("worldtimeapi.org")
                        .port(80)
                        .path("/api/timezone/{continents}/{city}")
                        .encode()
                        .build();
        URI uri = uriComponents.expand("Asia", "Seoul").toUri();
        //WorldTime 클래스를 사용해서 전체 응답 데이터가 아니라 datetime과 timezone 정보만 전달 받는다
//        WorldTime worldTime = restTemplate.getForObject(uri, WorldTime.class);

//        System.out.println("# datatime: " + worldTime.getDatetime());
//        System.out.println("# timezone: " + worldTime.getTimezone());
//        System.out.println("# day_of_week: " + worldTime.getDay_of_week());

        //getForEntity()를 사용한 Response Body(바디, 컨텐츠) + Header(헤더) 정보 전달 받기
        ResponseEntity<WorldTime> response = restTemplate.getForEntity(uri, WorldTime.class);
        System.out.println("# datatime: " + response.getBody().getDatetime());
        System.out.println("# timezone: " + response.getBody().getTimezone());
        System.out.println("# day_of_week: " + response.getBody().getDay_of_week());
        System.out.println("# HTTP Status Code: " + response.getStatusCode());
        System.out.println("# HTTP Status Value: " + response.getStatusCodeValue());
        System.out.println("# Content Type: " + response.getHeaders().getContentType());
        System.out.println(response.getHeaders().entrySet());

    }
}- 실행하면 아래와 같은 결과 값이 출력된다

3) exchange() 를 사용한 응답 데이터 받기
- exchange() 메서드를 사용한 방식은 일반적인 HTTP Request 방식입니다.
- HTTP Method나 HTTP Request, HTTP Response 방식을 개발자가 직접 지정해서 유연하게 사용할 수 있다
- exchange(URI uri, HttpMethod method, HttpEntity<?> requestEntity, Class<T> responseType)
- HTTP Method, RequestEntity, ResponseEntity를 직접 지정해서 HTTP Request를 전송할 수 있는 가장 일반적인 방식이다
- URI uri : Request를 전송할 엔드포인트의 URI 객체를 지정한다
- HttpMethod method : HTTP Method 타입을 지정한다
- HttpEntity<?> requestEntity : HttpEntity 객체를 지정하며, HttpEntity 객체를 통해 헤더 및 바디, 파라미터 등을 설정해줄 수 있다
- Class<T> responseType : 응답으로 전달 받을 클래스의 타입을 지정한다
package com.dreamfactory.restAPI;

import org.springframework.http.HttpMethod;
import org.springframework.http.ResponseEntity;
import org.springframework.http.client.HttpComponentsClientHttpRequestFactory;
import org.springframework.web.client.RestTemplate;
import org.springframework.web.util.UriComponents;
import org.springframework.web.util.UriComponentsBuilder;

import java.net.URI;

public class RestClientExample02 {
    public static void main(String[] args) {
        RestTemplate restTemplate = new RestTemplate(
                new HttpComponentsClientHttpRequestFactory()
        );
        UriComponents uriComponents = UriComponentsBuilder
                .newInstance()
                .scheme("http")
                .host("worldtimeapi.org")
                        .port(80)
                        .path("/api/timezone/{continents}/{city}")
                        .encode()
                        .build();
        URI uri = uriComponents.expand("Asia", "Seoul").toUri();
        //WorldTime 클래스를 사용해서 전체 응답 데이터가 아니라 datetime과 timezone 정보만 전달 받는다
//        WorldTime worldTime = restTemplate.getForObject(uri, WorldTime.class);

//        System.out.println("# datatime: " + worldTime.getDatetime());
//        System.out.println("# timezone: " + worldTime.getTimezone());
//        System.out.println("# day_of_week: " + worldTime.getDay_of_week());

        //getForEntity()를 사용한 Response Body(바디, 컨텐츠) + Header(헤더) 정보 전달 받기
//        ResponseEntity<WorldTime> response = restTemplate.getForEntity(uri, WorldTime.class);
//        System.out.println("# datatime: " + response.getBody().getDatetime());
//        System.out.println("# timezone: " + response.getBody().getTimezone());
//        System.out.println("# day_of_week: " + response.getBody().getDay_of_week());
//        System.out.println("# HTTP Status Code: " + response.getStatusCode());
//        System.out.println("# HTTP Status Value: " + response.getStatusCodeValue());
//        System.out.println("# Content Type: " + response.getHeaders().getContentType());
//        System.out.println(response.getHeaders().entrySet());

        //exchange() 를 사용한 응답 데이터 받기
        ResponseEntity<WorldTime> response = restTemplate.exchange(
                uri, HttpMethod.GET, null, WorldTime.class);
        System.out.println("# datatime: " + response.getBody().getDatetime());
        System.out.println("# timezone: " + response.getBody().getTimezone());
        System.out.println("# day_of_week: " + response.getBody().getDay_of_week());
        System.out.println("# HTTP Status Code: " + response.getStatusCode());
        System.out.println("# HTTP Status Value: " + response.getStatusCodeValue());
    }
}- 코드를 실행하면 아래와 같이 출력된다
※ 참조 링크
▶ URI scheme : https://en.wikipedia.org/wiki/List_of_URI_schemes
List of URI schemes - Wikipedia
From Wikipedia, the free encyclopedia Jump to navigation Jump to search Namespace identifier assigned by IANA This article lists common URI schemes. A Uniform Resource Identifier helps identify a source without ambiguity. Many URI schemes are registered wi
en.wikipedia.org
▶ Percent Encoding : https://ko.wikipedia.org/wiki/%ED%8D%BC%EC%84%BC%ED%8A%B8_%EC%9D%B8%EC%BD%94%EB%94%A9
퍼센트 인코딩 - 위키백과, 우리 모두의 백과사전
ko.wikipedia.org
▶ RestTemplate API : https://docs.spring.io/spring-framework/docs/current/reference/html/integration.html#rest-client-access
Integration
As a lightweight container, Spring is often considered an EJB replacement. We do believe that for many, if not most, applications and use cases, Spring, as a container, combined with its rich supporting functionality in the area of transactions, ORM and JD
docs.spring.io
▶ RestTEmplate API Docs : https://docs.spring.io/spring-framework/docs/current/javadoc-api/
Spring Framework 5.3.22 API
docs.spring.io
▶ Open API 서비스 제공 사이트
https://www.data.go.kr/dataset/3043385/openapi.do
공공데이터 포털
국가에서 보유하고 있는 다양한 데이터를『공공데이터의 제공 및 이용 활성화에 관한 법률(제11956호)』에 따라 개방하여 국민들이 보다 쉽고 용이하게 공유•활용할 수 있도록 공공데이터(Datase
www.data.go.kr
https://developers.kakao.com/docs/latest/ko/kakaologin/rest-api
Kakao Developers
카카오 API를 활용하여 다양한 어플리케이션을 개발해보세요. 카카오 로그인, 메시지 보내기, 친구 API, 인공지능 API 등을 제공합니다.
developers.kakao.com
https://developers.naver.com/products/intro/plan/plan.md
네이버 오픈 API 목록 - INTRO
네이버 오픈 API 목록 NAVER Developers - API 소개 네이버 오픈API 목록 및 안내입니다. 네이버 오픈 API 목록 API명 설명 호출제한 검색 네이버 블로그, 이미지, 웹, 뉴스, 백과사전, 책, 카페, 지식iN 등 검
developers.naver.com
https://console.cloud.google.com/getting-started?pli=1
Google Cloud console
계정이 일시적으로 차단되었습니다. Google이 네트워크에서 악성 소프트웨어, 브라우저 플러그인 또는 자동화된 요청을 전송하는 스크립트에 의해 전송되었을 수 있는 요청을 감지한 경우 계정
console.cloud.google.com
공공 인공지능 오픈 API·DATA 서비스 포털
과학기술정보통신부의 R&D 과제를 통해 개발한 다양한 인공지능 기술 및 데이터를 누구나 사용할 수 있도록 제공
aiopen.etri.re.kr
'Spring MVC' 카테고리의 다른 글
| Spring MVC(7) - API 계층 - DTO 유효성 검증(Validation) (0) | 2022.09.22 |
|---|---|
| Spring MVC(6) - API 계층 - DTO(Data Transfer Object) (1) | 2022.09.22 |
| Spring MVC(4) - API 계층 - HTTP헤더(Header) (0) | 2022.09.21 |
| Spring MVC(3) - API 계층 -Controller (ResponseEntity 적용) (0) | 2022.09.21 |
| Spring MVC(2) - API 계층 - Controller (MVC 개요/핸들러 메서드) (0) | 2022.09.21 |